April 27, 2022
 Designing a custom sticker can be a lot of fun, especially if you're experienced with design tools like Adobe Illustrator or Procreate. But if you're just learning and want to get a fun sticker idea out into the world, a tool like Canva can be an ideal solution. There are just a few things to know about creating print ready files with Canva.
First of all, Canva is a free tool that offers a paid Pro version if you want to level up. This quick tutorial covers both the Free and Pro versions, and we will be using the PDF download and SVG download options. SVG is an artwork file type, and we have many resources devoted to artwork on StickerGiant.com because we want to print the best possible quality sticker for you. You can use the non-Pro version, and we have export settings for PDF files at the end.
Since we prefer that you send us your artwork in vector format at 300dpi CMYK color mode, we'll go over creating a vector file in Canva that gets you closest to that resolution and file type. What's a "vector" file? Well, you can learn more about that on our vector versus raster artwork FAQ page.
Basically a vector graphic is an adaptable and scalable type of file ideal for logos and marketing materials that will be used for both digital and print purposes. Vector images are infinitely scalable graphics made up of paths, lines and shapes. Vector graphics are commonly made in Adobe Illustrator and have file extensions .ai, .eps and .svg. Because vector files can scale to different sizes, it means that a single vector image file can be used as a trade show background in a large format design, as the logo on your website, or as a sticker printed for your business. Vector files are powerful creative assets that put in serious work for your brand. Canva Pro offers the SVG download option, and we'll discuss that in below.
How To Set Up A Print Ready Sticker in Canva
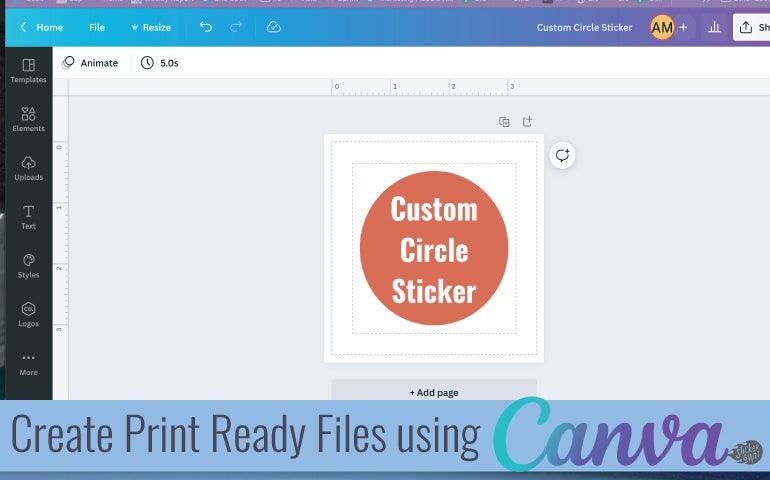 The file we will be showcasing in this example is a simple custom circle sticker with three lines of text, as you can see above. This design was made using the Circle shape found in the Elements Tab and then the text was created using the Text Tool. The circle itself is 2.5 inches by 2.5 inches.
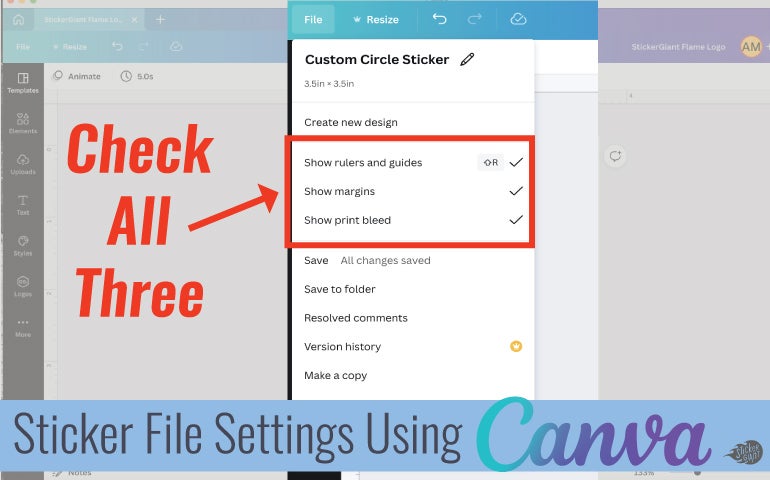
In the image above, you can see the rulers on the top and left side of the artboard area, and then there are two dotted lines around the sticker design itself. Those two lines are the margin and the print bleed, and to enable them you need to go to the File settings in the top left corner of Canva. You want to enable the rulers so you know the size of your artwork. Showing the margins will help you make sure that important design elements aren't cut when your design is printed. Showing the print bleed is important because it will ensure that your design fills the entire area that you want as a sticker, depending on the design. You can learn more about these settings on the Canva Help page.
Downloading a SVG from Canva Pro to print a sticker
Now that you have all three of these selections active in your sticker design, you can make sure your artwork is in the right place and you can move on to downloading your file. The steps below show the process of clicking on the File button, and then choosing SVG from the file type dropdown before clicking on the Download button, where you can save your file to your computer to upload to StickerGiant.com. Reminder, SVG is only available in the Pro Version of Canva.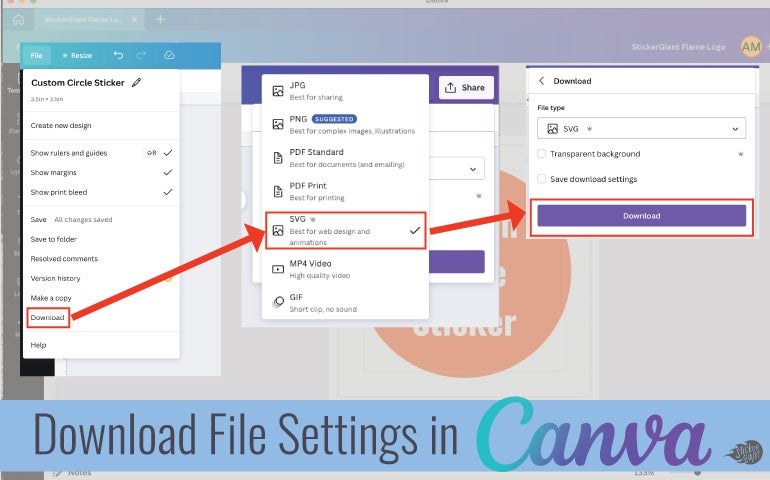
Downloading a PDF from Canva (free version) to print a sticker
If you do not have the Pro versions of Canva, the PDF Print option will work. If you are using the PDF Print file type download, be sure to choose the CMYK Color Space from the File type dropdown. Also, check the Crop marks and bleed selection to make sure your design fits in the printable area.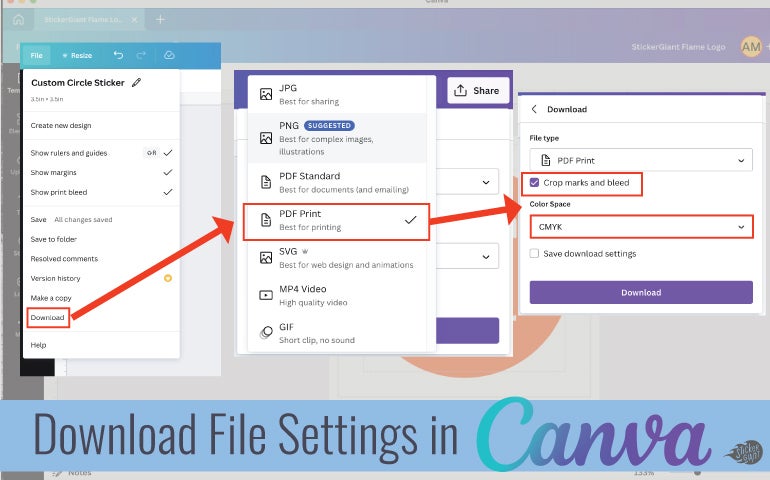 We hope this helps you if you're using either the free or Pro version of Canva to create sticker files. If you have more questions, our Customer Success team is standing by.
If you want to get serious about using Canva, try their Design School Course, Canva for Beginners.
